Monday, 11 March 2013

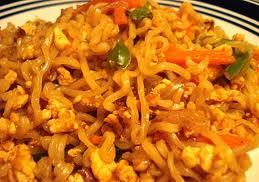
Low GI Jowar Vermicelli Upma

Hi,

This is the latest in my series of experiments with grains other than the wheat and rice we typically eat. I found a packet of Jowar Vermicelli at the local super market and thought it was worth a try. Now, I typically make vermicelli upma with wheat vermicelli and vegetables, so I figured the same recipe should work with a few tweaks for Jowar vermicelli. For the most part, the recipe worked just fine, except that the end result was a little stickier and didn't dry out as nicely as wheat vermicelli does, but no complaints with respect to the taste.

Here are the GI facts. 180 gms of cooked wheat vermicelli has a GL of 16 and a GI of 35-40 (unfortunately, I don't have the figures for Jowar, but I believe they may be a little higher than wheat). Those are reasonable figures, but we do want to bring it down to about 10 or 11 for it to be truly low GI. So, as usual, we use our favorite method to bring down GI and amp up nutrition. We add veggies. 120 gms of vermicelli makes about 300 gms of cooked vermicelli. That's typically enough to serve three people for breakfast. So, my guess is each serving should not have a GI greater than 10 or 11.

Here's the recipe:

Ingredients for Upma:
100 gms of Jowar vermicelli or regular wheat vermicelli
Very small piece of ginger grated
One big onion chopped finely
1 medium carrot chopped into small pieces
1 small bowl chopped cabbage
1 small potato chopped into small pieces
2-3 green chilis slit length-wise
1 small tomato chopped finely
3 cups water
Oil to taste
Salt to taste

For tempering:
4-5 curry leaves

1/2 tsp mustard seeds
1/2 tsp dehusked black gram (urad dal)
Peanuts (optional)


Method:

Roast the vermicelli in a little oil or ghee until lightly browned.

In a non-stick wok (I recommend this as this Jowar vermicelli tends to be a little sticky), heat up some oil and toss in the mustard seeds and black gram. Fry until the black gram turns orange. Then, throw in the curry leaves. Once the leaves are fried, add the onions, green chilis and grated ginger and fry for 4-5 mins on medium heat. Then add the remaining vegetables and fry them for 4-5 mins on medium heat. Add salt to taste. Cover and cook until the vegetables are done.
Add three cups of water (you may need less water for wheat vermicelli.) and cover until the water starts to boil. Put in the roasted vermicelli and cook until the water is absorbed. Cover and cook on low flame for another 5 mins. Turn off the flame and keep the lid on for another 5-10 mins.


You can roast some peanuts in a little oil and add them to the upma, if you like.

Serve hot :). Tell me how it turned out.


Sunday, 6 January 2013

Gotta Love Paneer (south indians included)

Several South Indians are not fans of Paneer, me included. No matter how I cook the damn thing, the spices never seem to penetrate its thick hide. The core is always milky white and bland. But-and there's always a but-Paneer is a very benign food from a glycemic load perspective. No definitive figures here, but I believe it has only about 10 gms of carbs in a 183 gms serving, so the glycemic load is about 7, hence this post.

I've tried Paneer in many forms and tolerated it in most, but the two recipes that have kinda worked for me are recipes I invented. One is a sort of tossed paneer salad and the other is a tava paneer. Both recipes are simple and any additions to the base paneer are even lower GI, so overall both dishes should be very low GI, though I cannot give you an accurate figure.

First up is the tossed paneer salad recipe. You can use this as a filling in a Kathi roll made of misi roti if you like or you can eat it as is.

Ingredients:

200 gms paneer (cut into cubical chunks about 3/4th of an inch in size. You can make them larger if you like)
1 big onion, cut into 3/4th inch pieces, kind of the way you cut onions to put them on a skewer (seekh)
2 small ripe tomatoes, cut into 3/4th inch size cubes. Remove the core of the tomatoes.The seeds are a mood killer in this recipe. I just eat the core. I never waste it.
1 big capsicum cut into 3/4th inch pieces
1/2 teaspoon of roasted zeera powder
Salt to taste
A pinch of sugar
Pepper or red chili powder (whichever you like better)
1 tablespoon of ghee. Oil will do fine too, but I prefer ghee.

In a non-stick wok, heat the ghee till it is sizzling hot. Throw in all the cut veggies and fry them on high heat. The reason we fry them on high heat is so that it doesn't get all watery. I like the veggies quite firm, but you can fry them as much as you like. For me the veggies are done when the skin of the capsicum shrivels just a little bit. Then, put in the roasted zeera powder, the salt, the pepper and the pinch of sugar. At this stage, you can add a teaspoon of tomato ketchup, if you like the taste. If you add ketchup, omit the sugar. Fry on low heat for a couple of minutes more and then toss in the paneer. Let the paneer get coated with the spice mixture and then fry it for another couple of minutes. The final product should be slightly moist, but certainly not wet.

You can eat this like a snack or you can roll it into a misi roti to make a kathi roll. You can also eat it as a side dish with any kind of roti. The key is to eat this straight off the stove or it's no fun.

Next up is the tava paneer. I eat this as a snack and it's ridiculously simple to make.

Ingredients

200 gms paneer sliced into big square or triangular pieces that are about a centimeter thick. You can slice them thicker if you like.
Roasted zeera powder
Pepper/red chili powder (optional)
Salt
Ghee to toast. Ghee tastes best with this recipe.

On an iron tawa (like a roti tawa), pour a small portion of the ghee and toast 4-5 pieces of paneer on both sides. Sprinkle the salt, zeera powder and pepper. Turn the pieces over and toast on the other side. Now, how firm you want the paneer is really a matter of taste. I just toast it enough to fry the spices a little ,about 1 minute on each side, and I take it off before the paneer starts to get crisp. This is because I like it soft. You can increase the amount of ghee and toast the paneer until it gets quite crisp too.

This snack is pretty healthy, if you go easy on the fat. And you get a good amount of protein this way.

So that's it for today. Tell me how you like it, if you try it :)

Sunday, 16 December 2012

Low GI Pongal/Khichdi - Basmati and Green Gram

Khichdi! That panacea for all tummy trouble, that pan-indian comfort food, that one-pot wonder that mommy/daddy can cook up in 20 minutes. Who doesn't love Khichdi?

The trouble as usual is the high-ish glycemic index of this food. It's anywhere between 45-55 and the glycemic load for about 200 grams is 30. That's high. We'd want to bring it down by quite a bit so it is at least medium GI, if not low. Unfortunately, I'm a little handicapped by the lack of proper GI measurements for Indian foods. So whatever I put here is just an estimate.

Here's what I suggest. Replace the white rice in khichdi/pongal with brown basmati rice or even regular basmati rice as these are considerably lower GI. The glycemic load for 100 gms of short grained white rice is between 20 and 30 and for basmatic rice, it is between 10 and 15, so you have a good reduction right there.Then, replace the mung dal (green gram) with whole mung dal. The GI of whole mung dal is ridiculously low at 5.

So for 200 gms of khichdi, your value should come down to between 15 and 20 at the very most. The value will probably be even lower, because of the added fat and high water content.

So here's the recipe. This recipe is for the South Indian variant, that is, for pongal. Using the same proportions and different spices, you can make khichdi too.


Pongal (Serves 5 at 200 gms per serving)

Ingredients

1 cup - Brown basmati rice (regular basmati rice is
fine too)
1 cup - Whole mung dal
2 tbsp - Ghee (can reduce this if you like)
1 tsp - Jeera
A fistful of curry leaves (optional)
3-5 shredded red chilis
Freshly ground pepper to taste. The powder should be coarse and granular. (I use a lot because I love the taste)
Salt to taste

Instructions

Wash the rice and dal and and cook them in a pressure cooker with 8 cups of water, if you are using brown rice. If you are using white rice, 6 cups of water is sufficient. Leave the cooker on a high flame until you get one whistle and then reduce the flame. If you're using brown rice, leave it on low flame for 15-20 minutes and then turn it off. For white rice, 10 minutes on a low flame is sufficient.

Once the dal-rice mixture is cooked, open the cooker and add the salt and the freshly crushed pepper. Store bought pepper powder will just not work in this recipe. The pepper has to be freshly and coarsely ground. Then, prepare your seasoning as follows. Heat the ghee in a small pan, throw in the zeera and wait for it to splutter. Then, add the curry leaves and shredded red chilis and wait until the red chilis change color. Don't allow them to burn, however. Pour this ghee mixture over the cooked dal-rice mixture.

That's it. Easy peasy and tastes awesome.

Note: If it's Khichdi you want, pour the ghee in the cooker before you put the dal-rice mixture in. Then, fry some chopped onions and mixed veggies and some whole spices (2-3 cloves, 1 inch cinnamon, 2-3 cardamom, 1 big bay leaf) in the ghee. The spices are optional; some people like them and some don't. Then add the dal-rice mixture, water and salt and cook it for the same amount of time as before. Tastes very different from pongal, but equally awesome.
 

Monday, 26 March 2012

Oat bran - It's the new suji

I'm theoretically quite crazy about oats. They're healthy and fiber rich and very good for your blood glucose levels. They're also good for your heart. Unfortunately, translating all my happy feelings for oats into happy food that I can eat was always a bit of a challenge. Until I discovered oat bran. So what's so great about oat bran? One, it doesn't cook into mush when you make an upma out of it (regular oats do that. Trust me. I know). Two, it might fit quite nicely in recipes that demand a suji (semolina) like texture.I think as a next step, I will try using roasted oat bran as a substitute for bread crumbs in cutlets and the like and see how it works out.

I tried out the upma and it worked out quite nicely for me. I hope it works out just as nicely for you. Here's the recipe:
(Sorry no photos. Ate it up before I thought to take a pic)

1 cup oat bran (Try Baggry's)
One big onion, chopped
A small piece of ginger, grated
Mustard 1/2 tsp (optional)
Chana dal and urad dal a teaspoon each (soaked for about half an hour in water. I soak it up-front because I don't like it when the dal is hard and sticks in your cavities)(optional)
Roasted peanuts (optional)
Curry leaves (optional)
A pinch of asofetida
Two green chilis sliced in half length wise
A cup of mixed vegetables, chopped into small pieces(carrot, beans, potatoes, green peas, whatever you have handy)
A tablespoon of grated fresh coconut (optional)
Oil (as much as you think is healthy)
Salt (whatever works for you)
250 ml water

Heat the oil in a non-stick pan.Using a non-stick pan may be important because oats tend to stick a little more than suji
Simultaneously, dry roast the oat bran on the side on a low flame, till the bran changes color slightly and you get a nice toasted smell
Put in the mustard and let it splutter. Add the soaked chana and urad dal. Saute till the dals turn a deep orange
Add the curry leaves and the green chilis and saute for a minute
Toss in the onions and saute till they turn translucent
Add the asofetida and the grated ginger and saute for another couple of minutes
Toss in the veggies and saute for about a minute
Cover and cook till the veggies are soft, but not mushy. Sprinkle a few drops of water every now and then, so they don't burn
Then pour in the water and bring it to boil. Add salt. At this stage, you can also add coriander leaves, if you like
Once the water boils, mix in the roasted bran slowly making sure that no lumps form
On high heat, keep stirring the mixture as it dries
Once it is more or less done and a little moisture remains, turn down the heat, add the grated coconut and cover the upma with a lid for about 2-3 minutes
After that switch off the flame and leave the lid on for 4-5 minutes to let the upma set
Throw in some roasted peanuts on top, if you like
Ta da. It's done. It's just your basic upma with some heart and insulin-friendly variations.


Let's look at what's healthy about it:

Oat bran: Tons of fiber. Good for your blood sugar. I think that the gi of the oat bran should be lowered by the fact that we roasted it and cooked it for less time than if we had just boiled it
Veggies: More fiber and anti-oxidants. Also reduce the GI of the meal considerably
Roasted peanuts and assorted dals: Low glycemic index and healthy fats
Fresh ginger and coconut: Good for all kinds of things, but am too lazy to research :)


Saturday, 13 August 2011

Missi roti (Low glycemic index chapati made with besan and wheat flour)

Whole wheat rotis are consumed pretty regularly in Indian households.  I've not been able to get definitive GI and GL values for rotis, but I think if you eat 3 phulkas (small indian flat bread made of wheat. No fat added in cooking), you get about 270 calories and a glycemic load all put together of about 20-25.

In terms of calories consumed, this is not bad. Unless, you eat it with something else that is really heavy. But the glycemic load is pretty high and one way of fixing this is to switch to a misi roti, which is made of one part atta (wheat flour) and one part besan (chickpea flour). Besan is much lower than atta on the glycemic index, so the average of the two will give you a better GI value. Also, besan is more filling, so you'll probably end up eating fewer rotis. So all in all, it's a great idea. Here's the data.


 Glycemic Index and Glycemic Load


Food
Chapatti, wheat


Category
Chapatti


66 ± 9 (medium)


21.12 (high)


Available carbohydrate
32 (g)


Serving size
60 (g)


 Glycemic Index and Glycemic Load


Food
Chapatti, baisen


Category
Chapatti


27 (low)


14 (medium)


Available carbohydrate
NA


Serving size
60(g)


However, even if you combine both flours, you still get a glycemic load of about 18 (remember the ideal is 10). So the best thing would be to either eat just two rotis or eat three rotis, but add some vegetables to the mix.

The downside is that if you like your roti all soft and fluffy, you won't get that with misi roti, but it's truly a small price to pay. So, here's the recipe for vegetable misi roti (you can omit the vegetables if you like).

Ingredients (Good for about 8-12 rotis depending on the size)
  1. 1 cup besan
  2. 1 cup flour
  3. 1 carrot grated really fine (any other vegetable like radish, or spinach will also be just perfect. No potatoes however)
  4. 1 onion chopped very fine
  5. 1 tbsp kasuri methi(dried fenugreek leaves)
  6. 1 tsp chili powder or 1 chopped green chili
  7. A pinch of turmeric
  8. Salt to taste (add very little salt if you are going to eat the rotis with some other salted item)

Method
Mix all the ingredients and add boiling hot water slowly. Mix the dough with a spoon until it it makes a hard dough. Then you can let it cool down a bit and then knead it with your hands using a little lukewarm water at a time until you get softer dough that you can roll out. Remember that this should not get too wet, or it will stick all over the place.

Roll out the rotis using a rolling pin. You can use wholewheat flour to roll it out. 

Then cook the rotis on a preheated skillet. It is better to cook them quickly on a high flame on both sides. Take them off the skillet and apply just a little ghee if you like. 

Eat them with any vegetable in gravy, but eat them right off the stove, otherwise they'll lose their softness and become tough and chewy.

Tip: Changing over from chapati to misi roti is a good permanent change to make. 

Low Glycemix Index Noodles Recipe


Maggi is one of my favorite foods. Whenever I am lost for ideas or plain lazy, it's the first thing I reach for. Junk food? Oh yes. But the good news is that this much-maligned childhood favorite is actually not too high on the glycemic index charts.

For those who demand evidence, these are the values from Rick Mendosa's GI lists. The GI is roughly fifty and the GL is about 11. Just for comparison's sake, the glycemic load of a similar amount of white rice -which no one considers junk food- is about 30 (that my friends, is high GL). 


Instant noodles

Instant 'two-minute' noodles, Maggi® 46±5        
11

(Nestlé, Australia) (1995)

Instant 'two-minute' noodles, Maggi® 48±8
12

(Nestlé, Auckland, New Zealand)

Instant 'two-minute' noodles, Maggi®, all flavors   52±713
(Nestlé Australia) (2005)

Now, 11 is not a terrible glycemic load value, but there are two things to keep in mind. One, the ideal GL value for a meal is 10 or less and two, Maggi is just maida. Yucky, zero-nutrition, intestine clogging maida.

So how to eat the beloved maggi, get the desired low GL and neutralize the anti-nutritive effects of maida? The answer is simple. Plenty of wonderful veggies. So here's my recipe for veggie maggi. It's hardly rocket science, but the USP of this recipe is that it is very quick and very low effort. So here goes.

Ingredients

1 packet maggi noodles (top ramen or foodles or anything of that nature will do just fine)
1 carrot (peeled and grated)
1 green/red/yellow bell pepper aka capsicum (chopped into little pieces)
1 tomato (grated)
1 onion (chopped finely)
1/4 tsp freshly ground pepper
1/2 tsp red chili powder (entirely optional. Works for me because I like to feel the food burning its way down into my stomach)
Salt to taste

Method

Heat two teaspoons of oil in a wok (kadhai). Add the chopped onions and fry for a couple of minutes. Add all the remaining chopped and grated vegetables and stir fry until the carrot changes color and becomes kinda soft.

Pour in about one and a half glasses of water, add the maggi masala and the pepper powder and the red chili powder (if you so wish) and bring the water to boil. Break up the maggi and add it to the boiling water. Lower the heat, cover the wok with a lid and let the noodles cook for 5-7 minutes. If it looks like the noodles are getting too dry or of you like soupy noodles, you can add a little extra water.

Check to see if the noodles are cooked and switch off the flame. Add as much extra salt as you like. It will need a little extra salt, because the salt in the maggi masala won't be enough for the vegetables.

This way two people can eat one packet of maggi and get lots of vegetables and I'm guessing the glycemic load of this recipe should be quite low because of the added fibre and the small amount of oil we used to fry the veggies.

So there you go. No need to feel guilty about eating maggi ever again.

Guggillu (Vegetarian and Low Glycemic Index snack made of chana dal)


Ingredients:

Chana Dal  - 100 gms
Red Chili/Green Chili - 2 whole (cut into small pieces)
Black small mustard seeds (Avalu or Rai in Hindi) - 1 teaspoon
Onions - 2 (chopped into very small pieces)
Curry leaves (optional) - 3-4
Asofetida - a pinch
Red chili powder (optional) - 1 tsp
Oil - 1 tbsp
Salt to taste

Servings (2-3)

Method:

Wash the dal and put it in a pressure cooker with 3 cups of water. Let the whistle blow once on a high flame and then turn the heat down and cook for a further 15 minutes. If you don't have a pressure cooker, boil the dal using some of the methods given here http://www.mendosa.com/chanadal.html.

No matter which method you use, the important thing is to ensure that after cooking, the dal is soft enough to chew and yet, retains its shape.

In the time it takes the dal to cook, you can prepare the seasoning. To do this, heat up the oil in a wok. Add the mustard seeds, the chilis (red or green) and the curry leaves. When the mustard seeds start to splutter, add the onions and stir fry them until they become soft. Add the asofetida and the red chili powder and stir fry for a minute.

Add the cooked dal to this mixture and add salt to taste. You can also add some finely chopped cilantro (coriander) leaves to the dal if you like the flavor of cilantro.

This is a wonderfully filling snack and it is ultra low glycemic index.

As per Rick Mendosa's GI Lists page, the gi and glycemic load values for chana dal are ridiculously low :). For 150 gms of boiled chana dal, the Glycemic load is just 3. So I am guessing one serving of this snack should be really low glycemic load wise.

If you try it out, tell me how it turns out.